Outils pour utilisateurs
Table des matières
DISABLED CHAIR
EQUIPMENT
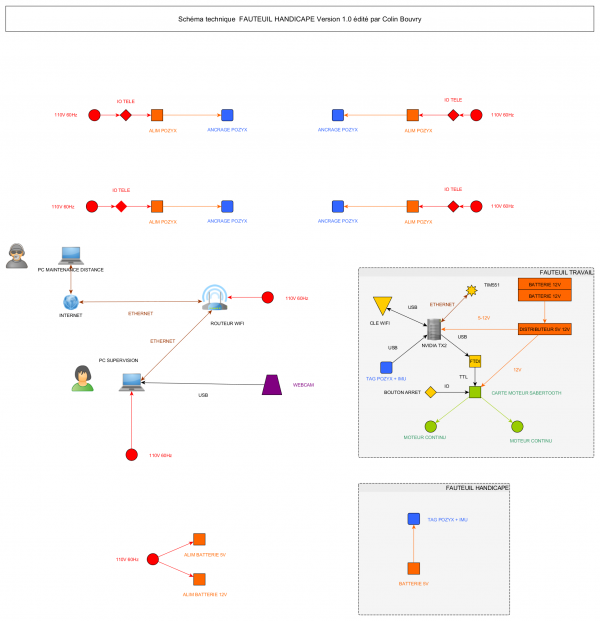
NETWORK
TEAMVIEWER
1 225 655 275
Port opening
Internet UDP TCP : 443 80
Teamviewer UDP TCP : 5938 443 80
Packet magic port 9 UDP
Teamviewer
Didier :
  48:d7:05:c2:a0:bb
  68:5b:35:cf:02:84
  00-00-00-00-00-00-00-00-00-00-00-00-00-00-00-00
Colin :
  enp3s0f1 : d0:17:c2:12:4b:d4
  wlp2s0 : 48:45:20:41:89:80
  00-00-00-00-00-00-00-00-00-00-00-00-00-00-00-00
PC oversight :
enp5s0f1 : f8:32:e4:2e:98:40 192.168.1.80
wlp4s0 : 94:65:9c:d1:2b:85
00-00-00-00-00-00-00-00-00-00-00-00-00-00-00-00
Router Netgear AC1750 :
SSID :
  DisabledChair1
  DisabledChair2
LAN :
  MAC Address 78:D2:94:1A:53:ED
  IP Address 	192.168.1.1
WAN :
MAC Address 78:D2:94:1A:53:EE
NVIDIA TX2 (robot) :
  eth0 : 00:04:4b:c5:7b:bf 192.168.0.10
  wlan0 : 00:04:4b:c5:7b:bd  192.168.1.81
  00-00-00-00-00-00-00-00-00-00-00-00-00-00-00-00
Configuration tinc
POZYX
Where to place the anchors
Rules of thumb
The following rules apply to the anchors from both the Creator and Enterprise series.
Place the anchors high and in line-of-sight of the user.
Spread the anchors around the user. Never on a straight line!
Place the anchors vertically with the antenna at the top or bottom.
Keep the anchors away from metal.
For 3D positioning: place the anchors at different heights.
The rules explained
Rule 1: Place the anchors high and in line-of-sight of the user.
The first rule is straightforward: placing the anchor high (on the ceiling or on the walls) increases the chance of receiving a good signal because there are less obstructions. Obstructions generally have a negative influence on the accuracy of the range measurements which has a direct effect on the positioning accuracy.
Rule number 2: Spread the anchors around the user. Never on a straight line!
For range-based systems, a single range measurements will only give information in a single direction. This direction is exactly the direction from the user to the anchor. Because of this, it is best to spread the anchors such that they cover all directions. If the anchors are all on a straight line, the positioning error will be very large. This can be seen on the image below. You can see that a small change in radius (for example due to noise), will result in a very large change in the position of the intersection(s). In other words, the error on the range measurements is amplified! This is the same principle as in GPS, where it is called the geometric dilution of precision (GDOP).
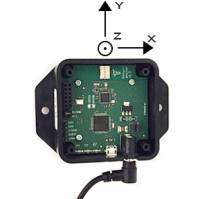
Pozyx anchor
Rule number 3: Place the anchors vertically with the antenna at the top.
The Pozyx system uses wireless UWB signals for positioning and this requires an antenna. However, it is physically impossible to create an antenna that performs good in all directions. The monopole antenna (the white chip) on the Pozyx devices radiates omni-directionally in the xz-plane, but doesn't radiate as well along the y-axis (see figure). To make sure that we have the best possible reception, it is recommended to place the anchor vertically. Note that the same is true for the Pozyx tags.
Rule number 4: Keep the anchors away from metal
When you place an anchor directly on a metal plate, the metal will affect the antenna behavior. It is advised to keep a distance of 20cm clear from the antenna with metal. The antenna itself is a metal conductor that is carefully designed to radiate on the UWB frequencies. Any metal nearby will reduce the antenna's efficiency or will make the antenna less omni-directional and less predictable. This rule is in fact true for every wireless system.
Rule number 5: For 3D positioning: place the anchors at different heights.
If the user and the anchors are all in the same horizontal plane, it is not possible to have a very good accuracy for the height (it is the same principle of GDOP
Configuration
$ ssh nvidia@192.168.1.81
$ cd ~/catkin_ws/src/pozyx_drivers
$ tree  $ cp launch/pozyx_ensadlab_306_norviz.launch launch/pozyx_ensadlab_rotonde_norviz.launch
$ sudo nano launch/pozyx_ensadlab_rotonde_norviz.launch 
Change the x, y, z parameters in mm in the same frame: :

Tip lay down the perpendicular laser with level by pointing the anchors.
$ cp launch/pozyx_ensadlab_rotonde_norviz.launch launch/pozyx_ensadlab_default.launch
Overwrite if necessary
ARMCHAIR SERVICE
$ sudo nano /lib/systemd/system/fauteuil.service
[Unit]
Description=fauteuil
After=multi-user.target rc-local.service sshd.service network.target
[Timer]
OnActiveSec=30s
[Service]
Type=forking
User=nvidia
EnvironmentFile=/etc/default/ros.env
ExecStartPre=/bin/bash /etc/default/ros
ExecStart=/bin/bash /home/nvidia/catkin_ws/src/ensadlab/src/ensadlab_launchers/scripts/navigation_arlobot2.sh
Restart=on-failure
TimeoutSec=infinity
#TimeoutStopSec=10
#RestartSec=60
[Install]
WantedBy=multi-user.target
Reload fauteuil.service :
$ sudo systemctl daemon-reload
Status :
$ sudo systemctl status fauteuil.service
Check in the journal :
$ journalctl -u fauteuil
Stop service fauteuil :
$ sudo systemctl stop fauteuil.service
Start service fauteuil :
$ sudo systemctl start fauteuil.service
Enable service fauteuil :
$ sudo systemctl enable fauteuil.service
Disable service fauteuil :
$ sudo systemctl disable fauteuil.service
SERIAL
$ udevadm info -a -n device_name
udev file :
SUBSYSTEM==“usb”, ACTION==“add”, ATTR{idVendor}==“0483”, ATTR{idProduct}==“5740”, GROUP=“plugdev” MODE=“0666”
$ sudo cp debian/udev /etc/udev/rules.d/pozyx.rules
$ sudo udevadm control –reload-rules
LOG
$ cd /home/nvidia/.ros/log/
$ sudo nano $ROS_ROOT/config/rosconsole.config
#
# rosconsole will find this file by default at $ROS_ROOT/config/rosconsole.config
#
# You can define your own by e.g. copying this file and setting
# ROSCONSOLE_CONFIG_FILE (in your environment) to point to the new file
#
log4j.logger.ros=INFO
log4j.logger.ros.roscpp.superdebug=INFO